This is just a quick tutorial on how to setup and configure the Automatic Bed Leveling system in Simplify3D for the FlashForge Creator Pro 3D Printer.
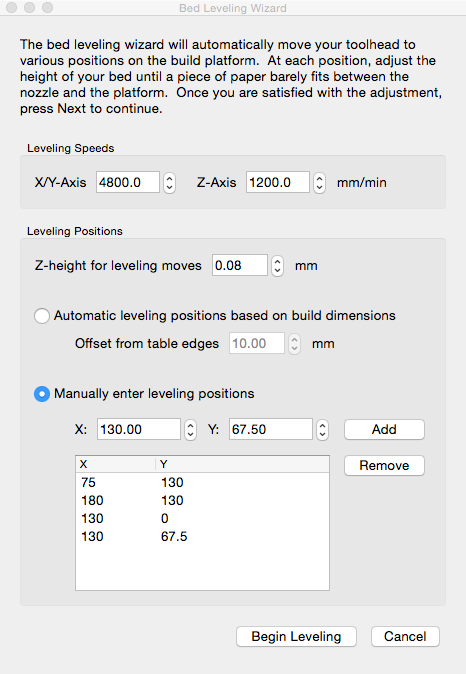
To automatically position the extruder to various points on the build platform for leveling, select “Tools > Bed Leveling Wizard” from the top menu.
Select “Manually enter leveling positions” and add the following positions:
- X:75, Y:130 (back left screw position)
- X:180, Y:130 (back right screw position)
- X:130, Y:0 (front center screw position)
- X:130, Y:67.5 (center of build platform)
When you’ve added these coordinates you will end up with something that looks a lot like this:

Now you can begin leveling the bed. Make sure you have the “Special Sheet for Build Plate Leveling” that came with your FFCP. If you no longer have that you can use a 0.10 mm (0.004”) feeler gauge (or sheet of letter sized paper).
Hit the button “Begin Leveling”. At first the extruder will move to a couple of extreme points. Once that has completed hit the “Next button” and the extruder will move to the coordinates entered about for the back left screw position.
Slide your leveling sheet (or feeler gauge) under the extruders. Turning the nuts on the bottom of the table CW (clockwise) makes the gap bigger (less resistance). CCW (counter-clockwise) makes the gap smaller (greater resistance). Turn the nut until your leveling sheet meets with a little resistance.
Now hit the “Next” button again and the extruder will move to the next set of coordinates (should be back right screw position). Complete the process of adjustment again and then repeat for the remaining 2 leveling positions.
You should now have your bed leveled properly which will limit adhesion problems and possible failures.


